Have you been thinking about straightening your teeth, slaying that snaggle tooth or addressing your bite for functional reasons? Do you love the idea of having a set-it-and-forget it type of orthodontic treatment that doesn’t involve keeping track of aligners or worrying about how many hours you’ve worn your appliance? But not into the thought of highly visible brackets and wires?
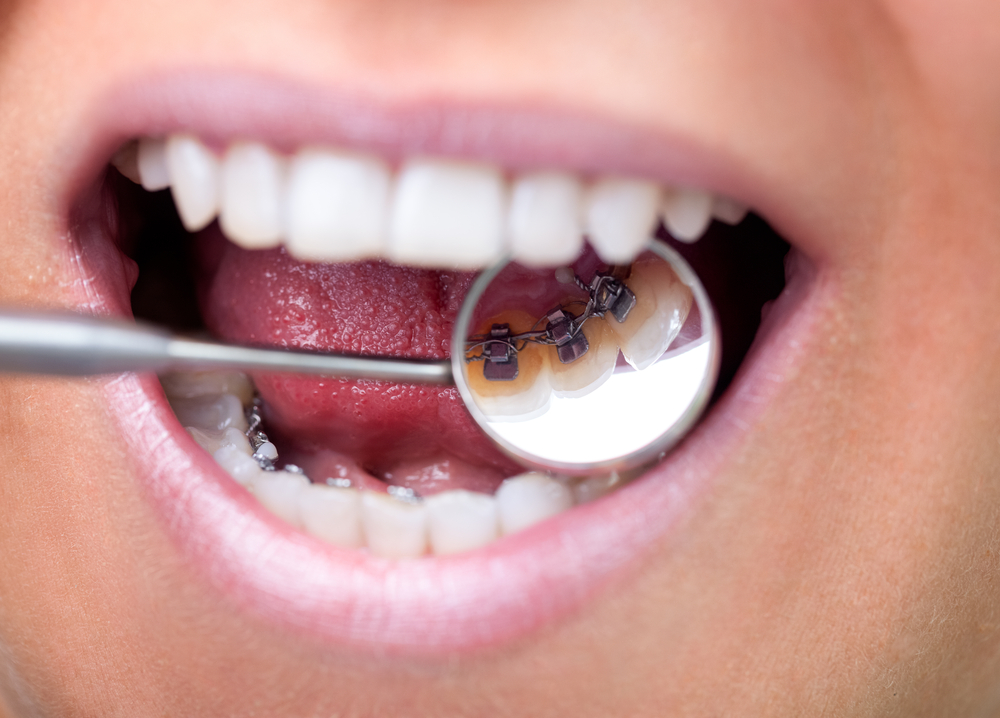
At Jeffrey Kwong Orthodontics, we have a solution that offers the best of both worlds: InBrace behind-the-teeth braces. This revolutionary treatment was designed by orthodontists to give patients an invisible treatment option that doesn’t need to be taken in and out of the mouth. The braces are placed behind your teeth, so no one can see them at all.
We’re the greater Sacramento area’s first InBrace provider and only one of two in the entire region. While these behind-the-teeth braces have become really popular with my patients, I know not everyone knows exactly how the process works. To help give you a better idea of what goes down during treatment, I’ve put together this guide to getting InBrace behind-the-teeth braces.
Table of Contents
Key Highlights of Hidden Braces:
- InBrace hidden braces are placed behind the teeth, making them completely invisible. Unlike clear aligners, you don’t need to keep track of them or commit to wearing them for 22 hours a day. No worries about keeping your aligners in during that presentation you need to give, or removing them for the coffee you’ve been sipping on all morning.
- These behind-the-teeth braces have several key advantages over conventional and lingual braces, including the use of efficient, comfortable SmartWiresâ„¢ that self-adjust, have a loop design for easier flossing, and start moving your teeth from start to finish in the most efficient way possible..
- The InBrace process involves high-tech, in-depth digital treatment planning upfront for the creation of customized smartwires for maximum precision.
- Getting your InBrace braces put on doesn’t hurt a bit. It’s actually faster than putting on regular braces because we deliver them with customized 3D-printed guides; and the progress you see between your regular visits will have you smiling. The WOW starts now! The end result is a fantastic smile!
- InBrace is our most customized treatment option, and because of that, it also tends to be our fastest treatment option. Customization helps us create the shortest, straightest path from beginning to end.
The InBrace Hidden Braces Basics
InBrace braces are a customized treatment option. The hidden braces are bonded to the back of the teeth, on the tongue-side. While conventional lingual braces are also bonded to the back of the teeth, they require elastics to be placed on each individual tooth and due to the use of standard wires, they also need regular tightening and adjustments.
As you can probably imagine, because of their location, the process requires more chair time and more frequent appointments, which is why the lingual braces cost has traditionally been much higher than the cost of regular braces. Not only that, the conventional set-up can lead to friction and discomfort and keeping them clean is pretty challenging for patients.
InBrace was created to overcome these obstacles. The invisible braces have extremely small brackets paired with customized smartwires. The smartwires use light, continuous forces to gently and efficiently move the teeth into place based on my pre-programmed treatment plan. Only a few elastics are needed, as opposed to rubber bands on every tooth. Instead, the wires are mostly held in place by a locking loop design that allows for friction-free movement without the need for frequent adjustments.
Treatment with InBrace braces is more comfortable and effective, and you can floss as you normally would between the loops (no floss threaders!). The other huge bonus when comparing these invisible braces to conventional lingual braces is that because of the efficiency, the InBrace braces cost is about the same as the cost of Invisalign or regular braces.
The Process of Getting Behind-the-Teeth Braces With InBrace
Step 1: The Consultation
You’ll visit our El Dorado Hills orthodontic office or, if you’d prefer, you can do a virtual consultation. If you come in for an in-person visit, a team member will take photos and digital x-rays, if necessary. I’ll examine your mouth and evaluate your bite to develop a diagnosis. I’ll walk you through my findings and talk with you about your treatment goals and concerns.
Of course, I’ll also answer any questions you have. If you’re a candidate for InBrace hidden braces, I’ll fill you in on everything you can expect during treatment, including how long it will take. A team member will then go over your insurance coverage, the InBrace braces cost and our convenient payment plans.
Step 2: Create a 3D, Virtual Model of Your Teeth
If you decide to move forward with InBrace treatment, a JKO team member will use our iTero® scanner to take quick, comfortable digital impressions of your teeth and gums. Don’t worry, with the handheld scanning wand, there’s no gagging on putty and it only takes a few minutes. The scans are sent to our computer instantly and a virtual, 3D model of your mouth is created. I plan out your tooth movements directly on this model. I can even show you what your new smile will look like before you start treatment.
This type of computerized treatment planning is amazing because I can visualize different outcomes and predict challenges on the computer screen before a single bracket is even placed on your teeth. Since the wires are custom-made and pre-programmed, they begin shifting the teeth where we want them from the first day of treatment instead of us having to make adjustments and manually bend the wires. Once the treatment plan is complete, your smartwires are created just for your smile based on my specifications.
Step 3: Get Your Behind-the-Teeth Braces Put On
When your wires are ready, I’ll put your InBrace braces on. Now, for the million dollar question: Does it hurt to get braces put on? I promise, it does not hurt at all! Getting braces put on is painless and we don’t use needles. First, we’ll put cheek stretchers in your mouth (think of “Speak Out” the boardgame) to keep your cheeks out of the way.
Then, I’ll apply solutions to clean and to prime the surface of the teeth for the special adhesive I use before sticking the brackets on the back of your teeth (it’s a little like putting stickers on something). The glue will hold your brackets in place throughout your entire treatment.
Once the glue is set, I’ll clip the customized InBrace smartwires through the brackets and place only a few elastics, letting the locking loop design do most of the work in securing the wires. My team and I will fill you in on everything you need to know about caring for your behind-the-teeth braces and you’ll go on your way, one step closer to your brand new smile.
Step 4: Come See Us for Visits
As I said before, the smartwires are pre-programmed and they self-adjust, so they don’t need to be bent manually and tightened like conventional wires. However, while you won’t need adjustments, you’ll still swing by the office for regular visits, so I can check on your progress and make sure your treatment is on track.
These appointments are a great opportunity for you to track your transformation. It’s also great time to ask questions, bring up any concerns, if you have them, and, of course, have a little fun with #TeamJKO.
Step 5: Get Your Invisible Braces Removed and Enjoy Your New Smile
When your treatment is finished, we’ll congratulate you and celebrate! Getting your braces taken off also doesn’t hurt. The braces will click off the teeth, and we’ll remove any leftover adhesive and polish your teeth.
Since you don’t have brackets and wires obscuring your smile throughout treatment, you will have been able to admire your progress in the mirror the entire time. But, hey, even with seeing your results take shape, getting your behind-the-teeth braces taken off is still a momentous occasion and you can bask in that perfectly straight grin!
Step 6: Retainer Time
I know, I know, getting your invisible braces off felt like the end of treatment but there is one more step and that’s wearing a retainer. Wearing a retainer is the only way to maintain your results for life. The teeth have a natural tendency to shift back to their old places when your braces are removed. A retainer prevents this by holding them in position as the tissues tighten back up and new bone forms around the teeth to secure them in place.
We’ll take digital impressions and fit you for a custom retainer. Our JKO retainer guarantee is something that sets us apart from the offices around us, so ask us about it. Eventually, you’ll only have to wear your retainer at night. It will be completely worth it when you see how sweet your smile looks.
I’m always on the lookout for proven technologies and treatments that can give my patients better results and a better treatment experience. InBrace behind-the-teeth braces are one of the innovations that allow me to do just that. If you’re interested in finding out if you’re a candidate for our El Dorado Hills InBrace braces treatment, schedule an in-person or virtual consultation at Jeffrey Kwong Orthodontics today!